
The photo was stuck to the album page. Not fully glued. One wrong move and the corner could tear. Many people know this moment. You inherit a box of family photos, open it with care, and feel both excitement and worry at the same time. You want to preserve what you see, yet touching it already feels risky.
Fragile photos call for patience and a clear plan. Digitizing and restoring them works best when each step protects the original while still capturing enough detail to bring the image back to life. The goal is preservation first, improvement second.
Why do fragile photos need a different approach?
Older photographs age in ways that are easy to overlook. Paper fibers dry out. Emulsions lose flexibility. Exposure to light, moisture, and air leaves marks that grow over time. A photo that looks fine inside an album can crack when bent or flake when pressed.
This fragility changes how digitization should happen. Quick scans, bright lights, and pressure from lids or rollers can add damage that never existed before. A careful approach treats the photo as a historical object, not just an image.
What often goes wrong with do-it-yourself digitizing?
Many people start with good intentions and a home scanner. Problems usually follow from speed rather than lack of care.
A scanner lid may press too hard on curled prints. Automatic feeders can create edges. Low resolution settings flatten fine details that restoration later depends on. Phone photos bring uneven lighting, glare, and distortion that software cannot fully fix.
Each shortcut reduces what can be recovered later. Once a detail is lost at the scan stage, no amount of editing can bring it back.
How to prepare fragile photos before scanning?
Preparation should stay minimal. The safest choice often involves doing less, not more.
Wash and dry your hands before handling photos. Avoid cotton gloves since they reduce grip and increase the chance of dropping the print. Remove photos slowly from albums if they come free without force. If resistance appears, leave the photo in place and scan it as is.
Skip cleaning attempts with liquids or wipes. Brushing dust lightly with a soft air blower is enough. Any aggressive cleaning risks lifting the image layer.
How to choose the right scanning method?
Flatbed scanners work best for fragile prints. They allow the photo to rest on glass without bending or feeding through rollers. The scanner lid should close gently or stay slightly open with support to avoid pressure.
Resolution matters here. A scan at 600 DPI captures surface texture, cracks, and subtle tones that matter later. Lower settings may look fine on screen, yet they limit restoration options once edits begin.
Color settings should stay neutral. Avoid automatic enhancements during scanning. The scan should act as a faithful record, not a finished image.
Why restoration comes after digitization?
Restoration always happens on a digital copy. The original photo stays untouched once scanned. This sequence protects the physical item and allows unlimited experimentation on screen.
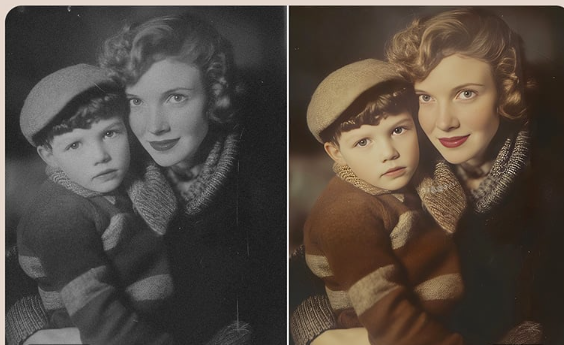
Digital restoration focuses on repair rather than reinvention. Tears can be closed. Stains can fade away. Missing corners can be rebuilt using nearby detail. The work respects the photo’s age and context rather than trying to make it look new.
This stage is where old photo restoration becomes most valuable, since skilled work balances clarity with authenticity.
What restoration can fix while respecting history?
Good restoration improves legibility without erasing character. Faded faces regain definition. Watermarks soften. Creases disappear. At the same time, skin texture stays natural, and lighting remains consistent with the era.
Restraint matters. Overcorrected photos often look artificial. Thoughtful restoration keeps the emotional truth of the image intact, allowing viewers to connect with the moment rather than the editing.
When professional help makes sense?
Some photos carry more risk than others. Severe tears, missing sections, mold damage, or emotional importance all raise the stakes. Professional services bring controlled scanning setups, experience with fragile materials, and time to work image by image.
Choosing help often comes down to one question. If this photo were damaged during scanning, would the loss feel acceptable? If the answer is no, expert handling offers peace of mind.
See also: next level innovation technology
How to judge a restoration service?
A trustworthy service explains its process clearly. It separates scanning from restoration and avoids physical repair claims. Resolution standards are stated up front. Revision policies allow feedback without pressure.
Communication should feel calm and respectful. The focus stays on preserving memories, not pushing upgrades or dramatic changes.
How to preserve the restored file?
Once restoration is complete, storage matters. Save high-resolution files in more than one location. External drives, cloud storage, and labeled folders all help prevent future loss.
Sharing copies with family spreads both access and safety. The digital version becomes the everyday photo, while the original remains protected.
Closing thoughts
Fragile photos ask for care, not speed. Digitization works best when each step serves preservation first. With gentle handling, careful scanning, and thoughtful restoration, images that once felt too delicate to touch can be seen, shared, and remembered for years to come.


